At the beginning of Silksong, Hornet is sent hurtling off a bridge when mysterious silk strands break the Seal of Binding holding her inside a cage. She arrives in Moss Grotto, beginning Silksong Act 1 as Hornet searches for a way back to the top of Pharloom to discover who captured her – and why they were so keen to bring her to the Capital as a prisoner.
Act 1 lasts from the beginning of the game until the Last Judge, who guards the entrance to The Citadel. This complete Silksong Act 1 progression guide offers an optimized route that takes players on the most direct path to collect every Map of every Act 1 area, unlock every Act 1 Bellway, beat every mandatory boss in Act 1, and collect every required ability in Silksong.
This complete Silksong Act 1 walkthrough does not include non-mandatory quests, NPCs, tools, collectibles, or other objectives that are not required to finish everything in Act 1 in Silksong.
Part One: Moss Grotto to The Marrow
- New Areas: Moss Grotto, The Marrow
- New Abilities: Silkspear
- Mandatory Bosses: Moss Mother, Bell Beast
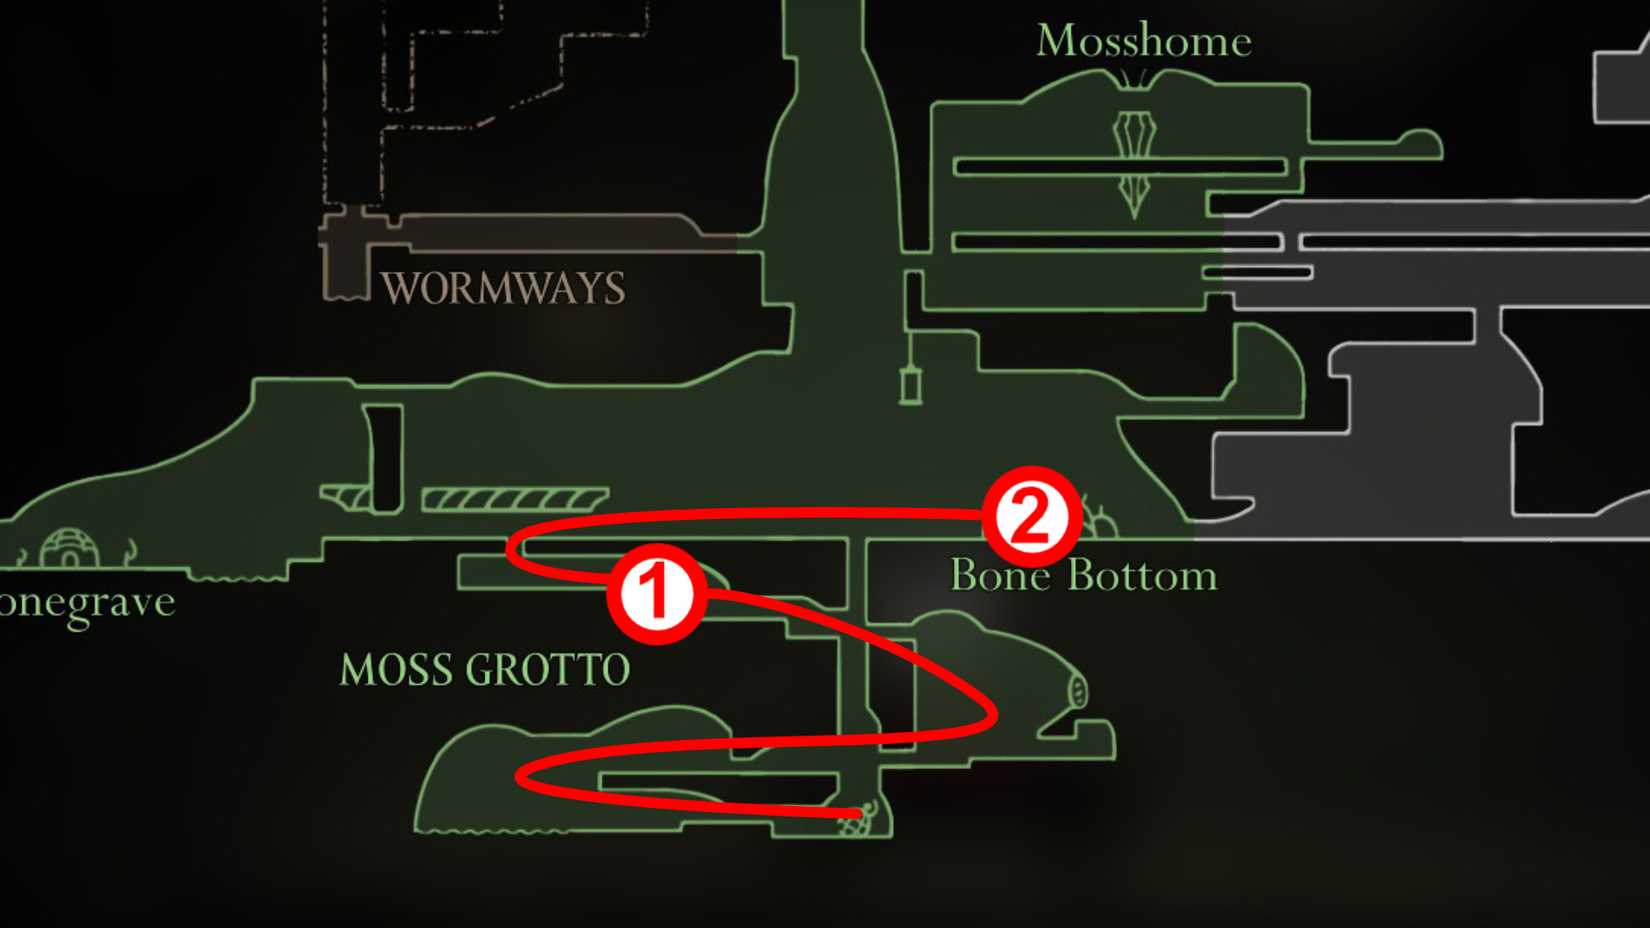
Exit Moss Grotto to Reach Bone Bottom
|
Map Marker 1 |
BOSS: Moss Mother |
|---|---|
|
Map Marker 2 |
TOWN: Bone Bottom |
Navigate your way through this relatively linear zone until you reach a Bench. Rest on it, then continue left to face off against the first mandatory boss in Silksong: the Moss Mother.
The Moss Mother is not a particularly tough boss, but for players who are not used to the boss design of Hollow Knight – or the way Hornet moves compared to the Knight – it can take a few tries. Upon defeat, continue left, then jump up into the next room to meet the Chapel Maiden. Continue right to enter the first town in Silksong: Bone Bottom.
Get the Map, Quill, & Compass in The Marrow
|
Map Marker 1 |
Bone Gate shortcut |
|---|---|
|
Map Marker 2 |
Shakra & Mosslands / The Marrow maps |
Explore Bone Bottom and enter the building with three rightward chevrons on it. This is a Bellway, one of Silksong‘s Fast Travel stations. Though you do not have the ability to Fast Travel yet, discovering this building will allow you to travel back easily later on.
Continue to the right into The Marrow and you will meet Sherma, who is trying to get a Bone Gate open. Jump up and around the Bone Gate, beat a brief gauntlet room, then drop down to open a shortcut back to Bone Bottom.
Continue right, then when you enter a large room, take the ceiling exit. Continue upward (and, if you so wish, take a brief detour on the way to meet the Fleamaster), then go left at the top of this tall room. Go left, and you will meet the cartographer of Silksong, Shakra. Purchase the Mosslands and Marrow maps from her to unlock the use of the map in Silksong.
She also sells the Quill and Compass, which records your map exploration and shows your location when the map is open, respectively.
Acquire Silkspear & Subdue the Bell Beast
|
Map Marker 1 |
ABILITY: Silkspear |
|---|---|
|
Map Marker 2 |
BOSS: Bell Beast |
Go left from Shakra, then jump up and take the ceiling exit. Continue left, then enter the top-left exit of this room back in the Moss Grotto area. You will find a Weaver statue in this room – use the Bind skill in front of it to absorb the Silkspear ability.
Go to the right of the statue, then take the bottom-right exit in the room. As you come to the drop down to Shakra’s room, jump over and go to the right. Use Silkspear to break the Bell Beast free, then subdue the Bell Beast to unlock the Marrow Bellway station and the ability to Fast Travel.
Part Two: The Marrow to Deep Docks
- New Areas: Deep Docks
- New Abilities: Swift Step
- Mandatory Bosses: Lace
Reach Deep Docks via The Marrow
|
Map Marker 1 |
LOCATION: Entrance to Deep Docks |
|---|---|
|
Map Marker 2 |
NPC: Shakra & Deep Docks map |
|
Map Marker 3 |
NPC: Forge Daughter |
From the Marrow Bellway station, go all the way to the right, jumping over the first tall room, then drop down into the tall room on the far right of the zone. Go all the way down this room, then all the way right across the wide-open room you drop down into, to reach the Deep Docks area.
Travel to the first room on the right and you will meet Shakra, who will sell you the Deep Docks map. Immediately to the left of Shakra you will discover the Deep Docks Bellway station. From here, go right, then drop down into the room below. Immediately go right to meet the Forge Daughter, an important NPC who will turn your Craftmetal into various Tools.
Acquire the Swift Step Silk Skill
From the Forge Daughter, return to Shakra’s room, then go up and to the left. Travel up this room, then go right for three rooms. Drop down, and loop left, to find another Weaver Statue. Bind in front of this statue to get the Swift Step skill. This skill allows Hornet to quickly dodge (press the input) into a sprint (by holding down the input).
Defeat Lace to Enter Far Fields
|
Map Marker 1 |
BOSS: Lace |
|---|---|
|
Map Marker 2 |
LOCATION: Entrance to Far Fields |
From the Weaver Statue, go left and drop down into Shakra’s room. Go to Shakra’s location, then go all the way to the right. Use the Swift Step ability in mid-air to get onto the platform above, then sprint and jump at the edge of the platform to reach a lever. Hit the lever to open a gate that leads into Lace’s boss room.
Defeat Lace, then continue to the right, to enter the Far Fields.
Part Three: Deep Docks to Far Fields
- New Areas: Far Fields
- New Abilities: Drifter’s Cloak
- Mandatory Bosses: Fourth Chorus
Traverse the Far Fields to Find Shakra & the Bellway
|
Map Marker 1 |
LOCATION: Far Fields Bellway station |
|---|---|
|
Map Marker 2 |
NPC: Shakra & the Far Fields map |
From the Lace boss fight, go right through several rooms until you find a room with what appear to be numerous air vents that point upward. Cross over the room and look for two exits on the right side to find Shakra, who sells the Far Fields map, and the Far Fields Bellway station.
Find the Seamstress to Acquire the Drifter’s Cloak
|
Map Marker 1 |
ABILITY: Drifter’s Cloak, via the Seamstress |
|---|---|
|
Map Marker 2 |
BOSS: Fourth Chorus |
From the Bellway station, drop down and take the exit leading right from the bottom of the tall room. You will pass by an automaton in the background as you journey. Keep going right, and navigate around the bottom of the floating building in the large room you reach, to meet the Seamstress.
Pick up the Flexile Spines quest from the Seamstress, then look for Hoker enemies in the nearby areas. These are the flying enemies with spikes coming out of their sides. When Hornet hits one, the spikes will launch out, becoming acquirable items. Collect 25 of these, then return to the Seamstress, to get the Drifter’s Cloak.
Exit the room via the entrance you took to get in, and you will run into the Fourth Chorus – the automaton that was once in the background is now a boss standing in Hornet’s way. Defeat the Fourth Chorus to progress.
Fly Through the Ceiling of Far Fields to Reach Greymoor
|
Map Marker 1 |
TOWN: Pilgrim’s Rest |
|---|---|
|
Map Marker 2 |
LOCATION: Entrance to Greymoor |
With the Drifter’s Cloak in hand, take the exit to the left of the Fourth Chorus boss, then use it to float upwards. Some platforms have explosive rocks on them on the way up – land on these, hit them, then quickly get away to release a new air vent in its location. You cannot get up this tall shaft without breaking a few vents open.
Near the top of the room you will find an exit leading right into Pilgrim’s Rest. Take the exit to the top-left of this small settlement, then continue using the Drifter’s Cloak to make your way upward. Eventually, you will break through the ceiling of the Far Fields and enter Greymoor.
Part Four: Greymoor to Shellwood
- New Areas: Greymoor, Bellhart, Shellwood
- New Abilities: The Hunter’s Journal, Cling Grip
- Mandatory Bosses: Moorwing, Sister Splinter, Widow
Get the Map, Hunter’s Journal, & Bellway
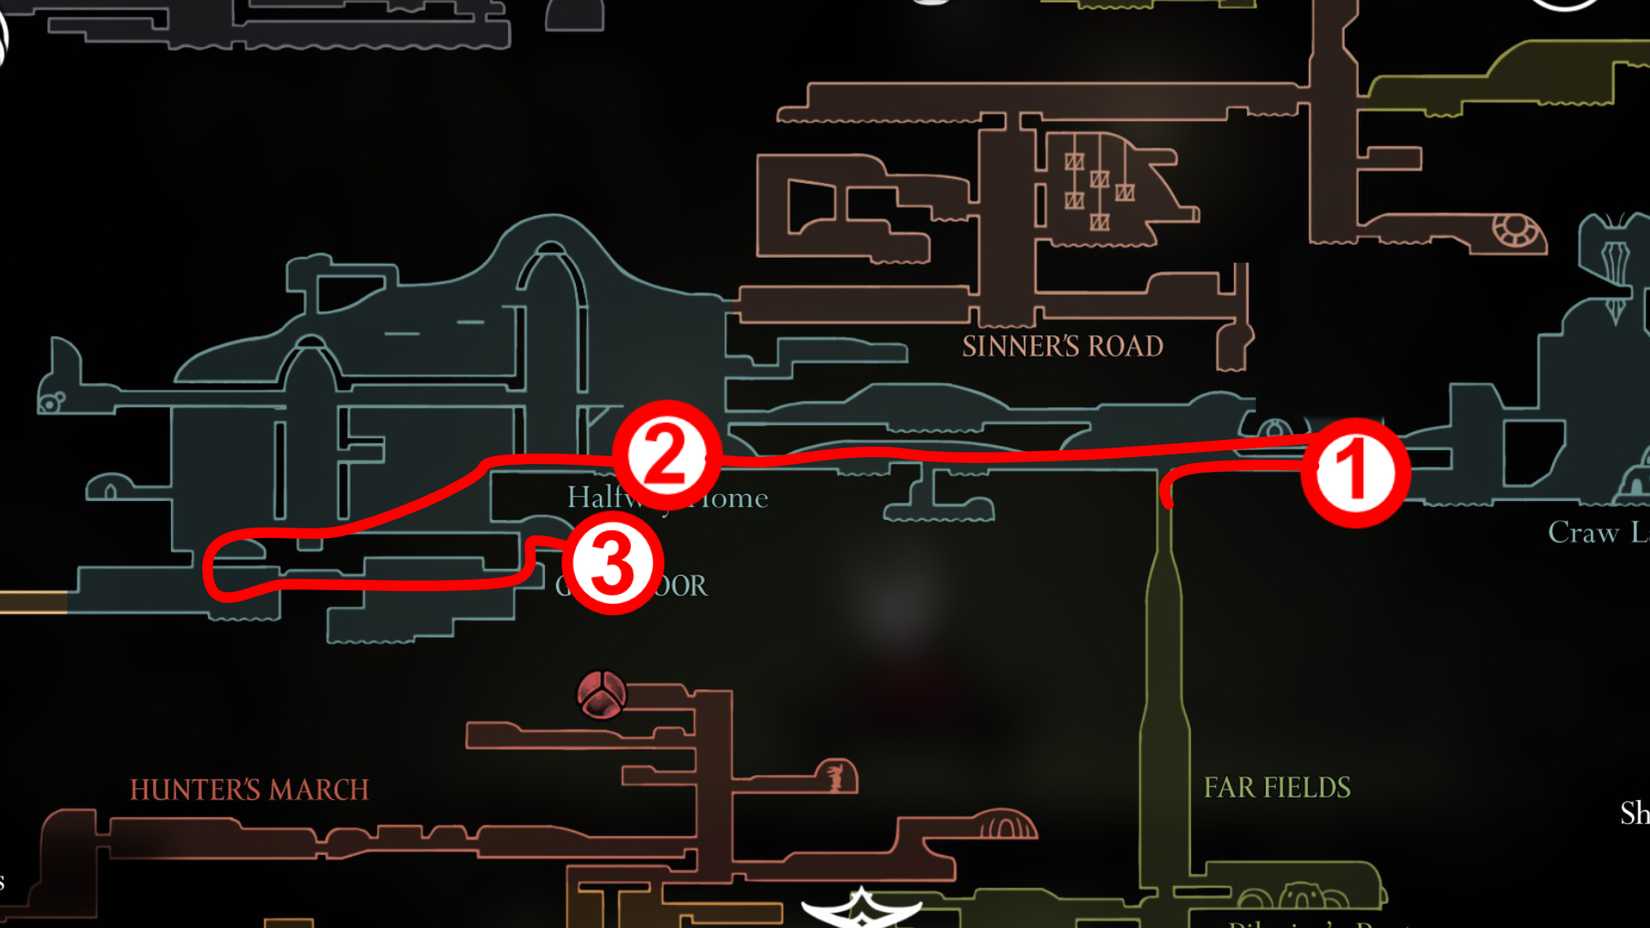
|
Map Marker 1 |
NPC: Shakra & Greymoor Map location |
|---|---|
|
Map Marker 2 |
LOCATION: Halfway House & The Hunter’s Journal |
|
Map Marker 3 |
LOCATION: Greymoor Bellway Station |
From the entrance to Greymoor from the Far Fields, immediately head right to find Shakra and purchase the Greymoor map. Then, go all the way to the left until you find a large building with a locked door. Platform around to the left side of the building to get to the entrance to the Halfway Home.
Enter the Halfway Home and jump up into the attic to meet Nuu. Nuu will give you the Hunter’s Journal, which records every enemy you defeat across Pharloom.
Continue to the left of the Halfway House until you reach a drop below a cage with an enemy wielding scissors. Drop down, go right, then take the air vent upward to enter an interior area filled with large rat-like enemies. Make your way to the right of this area to find the Greymoor Bellway.
Defeat Moorwing to Unlock Haunted Bellhart
|
Map Marker 1 |
BOSS: Moorwing |
|---|---|
|
Map Marker 2 |
TOWN: Haunted Bellhart |
From the Halfway House, run all the way to the left, jump across both enemies in your path, continue left, then drop down below the cage. Once again, go right to drop onto an air vent, but this time, go left instead of right.
On the far left side of Greymoor, you will encounter the Moorwing boss. Defeat Moorwing to gain access to Haunted Bellhart.
Find Shakra & the Shellwood Bellway
|
Map Marker 1 |
LOCATION: Shakra & Shellwood Map |
|---|---|
|
Map Marker 2 |
LOCATION: Shellwood Bellway station |
Haunted Bellhart is ensnared in an enigmatic curse with residents lifted eerily into the air as Hornet arrives. Continue to the left to enter Shellwood. Platform your way up this first room to get to an exit in the top-left. Go leftward in this room, then drop down into another large marshy area. Drop down to the bottom-left of this room, then continue left, to find Shakra’s location in Shellwood.
Purchase the map from Shakra, then continue left. Jump up the tall room using the white flowers and ledges to ascend. Go left at the top to reach the Shellwood Bellway station.
Defeat Sister Splinter to Acquire the Cling Grip Skill
|
Map Marker 1 |
LOCATION: Central Bench |
|---|---|
|
Map Marker 2 |
BOSS: Splinter Sister |
|
Map Marker 3 |
ABILITY: Cling Grip |
From the Bellway, go practically directly to the right, using white flowers to make it across several gaps along the way, until you reach an elevator. Use the Elevator to get back to a central Bench, which serves as a great respawn point for both Shellwood bosses.
From the Bench, take the Elevator back up, go into the room to the right, then loop around to get to the top-left exit. Continue to the left to reach the Sister Splinter boss. Beat Sister Splinter, then continue left, to get to the top half of a large room you were in earlier. Navigate around the bottom of the central column, then loop back to the top-right to reach the Weaver Statue.
Use the Bind skill in front of the Weaver statue to earn the Cling Grip skill, which grants Hornet the ability to wall jump.
Defeat Widow to Acquire Needolin & Needle Upgrade
|
Map Marker 1 |
LOCATION: Central Bench shortcut |
|---|---|
|
Map Marker 2 |
BOSS: Widow |
|
Map Marker 3 |
TOWN: Bellhart |
From the Weaver Statue, make your way back to the central Bench. Get to the top-right room via the elevator or via walljumping, then instead of going to the top-left, use your new Cling Grip skill to get to the top-right of the room. Go right, drop down, then go left.
You will see a drop-down here – jump over it, then continue left to find a shortcut back to the bench. Go back to the drop and go into the room below to find the Widow boss room location.
Defeat Widow and you will unlock the Needolin ability. Exit her boss room to the right to discover the Bellhart is no longer haunted, and all NPCs have returned to normal.
Go left from the Bellhart bench, jump up the platforms, then go right to meet the Relic Seeker Scrounge (who takes your Relics in exchange for Rosaries) and Pinmaster Plinney. Plinney will upgrade Hornet’s Needle for free as thanks for saving Bellhart from the Widow.
Part Five: Shellwood & Blasted Steps
- New Areas: Blasted Steps, The Citadel
- New Abilities: N / A
- Mandatory Bosses: The Last Judge
Find Shakra & The Blasted Steps Bellway
|
Map Marker 1 |
NPC: Shakra & Blasted Steps Map Location |
|---|---|
|
Map Marker 2 |
LOCATION: Blasted Steps Bellway Station |
After you free Bellhart, there’s only one thing left to do: get to the Blasted Steps to enter the Citadel. Travel back to the Shellwood Bellway station via the station in Bellhart, then go left to enter the Blasted Steps area. Go left, then jump up at the first ceiling entrance, to continue through the zone.
Eventually, you will arrive at a point above the path you passed through on your way left from Shellwood. Go right to find Shakra in the next room. Purchase the Blasted Steps map from her, then continue to the top-left of the room. Ascend up this central column room, then go left, to discover the Blasted Steps Bellway station and a Bench.
Survive The Route to The Last Judge
|
Map Marker 1 |
LOCATION: Breakable Wall Shortcut |
|---|---|
|
Map Marker 2 |
BOSS: The Last Judge |
In the final stretch of Act 1, you must carefully navigate the dangerous, enemy-filled areas that lead right toward the entrance to the Citadel. The runback to the Last Judge is considered by many to be the hardest boss runback in the game, but if you unlock a shortcut about halfway through (by looping back before the safe platform between the two large rooms), it becomes much easier to traverse.
Get to the entrance to the Citadel, then go inside and talk to the pilgrims next to the Citadel gate. Play your Needolin to ring the bells on the gate, then wait until The Last Judge appears.
Defeat the Last Judge to Complete Act 1 in Silksong
After you defeat The Last Judge, you will unlock access to Act 2 and gain entrance into The Citadel. Watch the cutscene, then continue to the right to enter the Grand Gate area. Spend Rosaries on the machine that displays a model of the Citadel to get a map, then get started on your journey through Act 2!


